Monday, October 29, 2012

Buttery Milk Kifer Mayonnaise

Buttery Milk Kifer Mayonnaise goes great on almost anything.  Even spread on
crackers.
I've found another way to use my milk kifer.  It is so good I had to share.  In my research, I found a few egg-less recipes for homemade mayonnaise.  They used milk instead of eggs.  So I thought if you could make it with cold milk, well why not cold kifer milk?  And with a healthy oil base.  I am so glad I did.  I just made a few adjustments, and now my milk kifer mayonnaise is so buttery, it should be called Buttered Milk Kifer Mayonnaise.
Adding the virgin coconut oil really gave it
a smooth texture, and creamy taste.  What
a great choice.  Now this is "Best Foods, Real
Mayonnaise", homemade.

Now this is definitely a safer way to pack a sandwich, or more suitable for that potato salad that might sit at a gathering.  Milk kifer mayonnaise is eggless which makes it a better alternative for any store bought mayonnaise.  It goes great on a sandwich or a salad of your choice.  Yum, a baked potato topped with a dollop of buttery milk kifer mayonnaise sounds healthier too.Not only that, it still has all the natural probiotics that is in the milk kifer, and it is now lactose free. And it tastes so buttery good.

Milk kifer is made from milk kifer grains.  It is milk that has sat in the milk kifer grains until it has fermented and turned into a natural probiotic.  This usually takes from 8 to 24 hours depending on the ratio of milk kifer grains, milk and room temperature. Once the milk kifer has fermented, it changed the intolerable lactose into lactate, and is now a natural probiotic food.  Our body can tolerate lactate much better. I will say this, natural probiotics have changed my life tremendously for the better health-wise.  Milk kifer is one of the natural probiotics I use.  Allow me to suggest, if you don't know about the health benefits of milk kifer, investigate it further for you own benefit.  So with this, I will continue.

Buttery Milk Kifer Mayonnaise
Ingredients:
Blend on high, milk kifer,
garlic, lecithin, and lemon
juice
  • Milk Kifer 1/2 cup (Tart is best)  Ice cold. Set it in the freezer for 15 minutes
  • Oil  1/2 cup
  • Coconut oil 3 tablespoons.  
  • Garlic 1 small clove
  • Lecithin 1 teaspoon
  • Salt  1 teaspoon (don't omit if you want the kifer taste to remain the same)
  • White pepper 1/2 teaspoon (I only had black pepper on hand)
  • Lemon juice or vinegar 1/2 to 1 teaspoon (omit this step if milk kifer is already tart enough
  • Small blender, or hand held mixer
  • 2 cup clean jar
Once blended put in freezer for 15 minutes
Instructions:
  • Mix milk kifer, garlic, lecithin, and lemon juice in jar and blend well on high
  • Add oil slowly mixing on high speed for about 2 minutes.
  • Add coconut oil, salt and pepper and blend again on high for one minute.
  • Put jar in freezer for 15 minutes
  • Blend again on high till thick and smooth
Now re-whip and watch it churn like butter.
Adding the virgin coconut oil was a very
good idea.  Smooth, and creamy texture
and taste.
This buttery milk kifer mayonnaise is like a whipped butter and is best served cold.  At room temperature it does become more like a very tasty creamy sauce.  Sort of like a ranch dressing, which is still yummy. Store in the refrigerator  in a sealed container.  It should be used within two weeks for best results. You can be creative and add different spices depending on your liking. Well now my milk kifer mayonnaise has become a tasty medicine.  After all, food is medicine right?


Buttery Milk Kifer Mayonnaise should
be put in a sealed container, and stored
 in the refrigerator for best results.
Please feel free to share this delicious whipped buttery milk kifer mayonnaise recipe with your family and friends.  Send them here for healthier natural probiotic recipes.  So easy to make and so much cheaper if it's made at home. Well that's it for now folks.  So till the next time.
Many blessing:)

Sincerely,

Mary Helen

Thursday, October 18, 2012

FERMENTED GREEN APPLE PICKLE

Fermented Green Apple Pickle that only gets better with age.  A lot of juice
has released after almost 30 days creating a nice tangy spicy syrup.
Yes, Food is medicine.  Isn't there a saying about an apple a day?
Wow, imagine a fermented probiotic apple:)
Fermented Green Apple Pickle only gets better with age.  More of a "Indian mango-pickle taste", and a lot more probiotics now that it's fermented.  It's an all natural and homemade apple preserve, preserved Indian style before referigeration.  Every single herb used here has micro-phyto-nutrients, and has it's own medicinal property.  Way to go, heal while you eat.  I can deal with that.

Why Indian style?  Because in my research I believe Indian food to be one of the worlds healthiest foods with their choice of spices alone.  Spices are herbs.  Ayurvedic medicine comes from India and uses a lot of herbs for healing.  Herbs are plants.  Plants have micro-nutrient phytochemicals necessary for cellular rejuvenation. Now combine these spices, with fresh green apples totally raw, and some time, and voila, you have yourself a pretty healthy probiotic pickle in time. So delicious, it makes your mouth water just thinking about them.  All it takes is a spoon to accompany your naan bread, or rice.  Yum.  Healthy.

Let's do it using 4 small Granny smith apples (Organic preferred since we are fermenting, but not necessary)

  • Granny Smith or Tart apples 4 small, washed and cut into small pieces (about 1 inch)


In a bowl mix:

  • Red chili powder 2 tablespoons
  • Mustard powder 2 tablespoons I used black mustart seeds (very strong)
  • Garlic-crushed    1 tablespoon
  • Sea Salt              1 tablespoon
  • Tumeric              1/2 teaspoon
  • Fenugreek seeds (Methi) and or powder 1/2 teaspoon
In a bowl mix all your dry herbs as described .
Not the same herbs for tempering.
Put this bowl aside
In a fry pan add:
  • Oil 1/2 cup.  Use a good quality oil.  I used sesame oil
Heat oil then add:
  • Mustard seeds 1/2 teaspoon
  • Cumin seeds    1/2 teaspoon
  • Dried red pepper  2-3 cut in 3-4 pieces each
  • Garlic  6-8 fresh cloves cut in 1/2.
  • Asafoetida powder  1/2 teaspoon  (Found in Indian stores or online.  Pronounced "hiing") Ps. this herb really smells.  I put the container in a jar and seal it tight!
  • Curry leaves 5-6 leaves crushed in big pieces
Follow picture tutorial from here on end:)
Tempering:  Frying mustard seeds, cumin seeds, and
dried red pepper till sizzling and seeds start popping.
Turn off heat, add curry leaves..and let cool to room temperature.
(I didn't have any curry leaves at the time, oh well it was fine.)
Once it is at room temperature add tempered oil to
bowl of spices.  Mix well.
Add green apples and green chili.  Mix well.

This is what it looks like after 12 hours of "marinating" in the
spices.  You can eat it as is.  It is quite tasty.  However, to get 
the probiotics, it must ferment for at least 2 weeks.
Note:  If you are going to save some for later.  Put it
in a sterile jar, with a sterile cap.  All fruit in jar
must be immersed in liquid.  You can
top off with the same type oil you
tempered with.  Store in
refrigerator.
 I hope you try this delicious Indian Green Apple Pickle recipe, that happens to be fermented.  Better for you homemade right?  Yes!  Why?  Because the Mango and or Green apple pickles that are sold in Indian stores have been pasteurized and only have the spiced pickled apple and not the probiotics.  Probiotics is a good thing. I just took this recipe back to the old days, before they had refrigeration.  This is one way they preserved their food.  Tried and true. This is a quite popular Indian dish ready to accompany any bread, rice, or whatever Indian dish you like.  Remember, it only takes a little bit. Perhaps a tablespoon here and there, and your gut will be flourishing with a healthy bacteria...PROBIOTICS.  Remember folks, food is medicine.  I must admit, this is pretty cheap medicine, that costs but a few green apples, and some herbs.  Nice thought.

Well that's about it for now.  Please feel to share this blog with your family and friends.  Ask any questions you may have.  So for now I leave you with, peace, and many blessings to all.

Sincerely,

Mary Helen

Sunday, August 5, 2012

STRAWBERRY VANILLA KOMBUCHA ICEE

It's strawberries galore, because they are in season.  Not only are they tasty little berries, they are so full of phyto-nutrients, also known as rejuvinating, healing, anti, aging, anti cancer nutrients. Not to mention they are a good source of fiber.  They are a necessary element to our well being.  Now to mix this with green tea kombucha and Voila!  This is now a berry good drink, right?  Not only is if filled with the above goodness, it is full of probiotics.  And it tastes good too.  Your family will love this probiotic drink.  You don't even have to tell them it has kombucha.  My son won't touch kombucha but if I disguise it, he'll drink it all with a smile wanting a refill.  That makes me one happy camper.
Ingredients:
Strawberries 1/2 cup washed and stemmed
Kombucha 8-12 ounces (more or less)
Ice 2 cups (more or less)
Brown sugar (1 tablespoon)
Vanilla 1 teaspoon
Blender that can crush ice.
Put all this in the blender and blend till desired thickness.  If you would like to scoop it out, add more ice.  If you like to drink it add less ice and or more kombucha.  It's your choice. This a great way to cool down on a hot summer's day.  So easy, so good, and so refreshing.  Better than anything store bought.  And it only costs but a few berries, and some green tea to make your Strawberry Vanilla Kombucha if you make it at home.  So did I  hear someone say it costs too much to eat healthy?  Not so if it's homemade.
Till the next time...many blessings to all.
Mary Helen

Thursday, July 26, 2012

ALMOND MILK KIFER

Raw live  almond kifer milk
Here is another delicious recipe that is so easy and full of healthy probiotics.  It has a tangy taste and is quite refreshing as is. I happen to like plain yogurt, buttermilk, and plain kifers.  But I suppose many folks might not like this unless it is in a smoothie with fruit.  I make my own almond milk, so I always have access to it.  If your interested in my almond milk recipe you can find it in my other recipe blog  here at...
                                                maryhelenstestskitchen@blogspot.com
Anyway here is how I do it.

Ingredients:
  • Milk kifer grains  1/3 cup more or less
  • Almond milk 2 cups more or less
  • One clean container.
Instructions:
  • Pour almond milk in rinsed kifer grains.
  • Let sit at room temperature preferably 78 degrees fahrenheit
  • strain when desired tartness and refrigerate.
  • Rinse milk kifer grains well and put back in dairy milk as it thrives in dairy milk
Almond milk kifer looks quite done in my milk
kifer grains.
Easy enough for you?  And it really adds up and saves on your pocket book if you make it homemade.  It is so much richer in probiotics because it is homemade.  It is not heat controlled for market sale and therefore carries a lot more live healthy bacteria.  We need this to act like little pacman and gobble up that unhealthy bacteria right.  There is too much illness going around and probiotics is one way to ward that yucky "C" illness, and diabetes.

This was an easy strain.  Look at the
grains, they look clean right out of
the kifer almond milk.  I still need to
rinse well before I put it
back in dairy milk.
Remember, our body remains at 98.6 F right?  Well it's a perfect breeding ground for bacteria!!!  And with the undigested over processed foods remaining behind in your intestines causing havoc. It poisons you slowly or perhaps fast, causing a multitude of illnesses.  Not a laughing matter.  That's why I make natural probiotic foods.  I've cured my diabetes, and all that trimmings using probiotic foods.  Doctors told me I could not get off my meds.  Guess what?  I changed my diet by adding more probiotic foods like kifers, kombucha, and ferments, and my tests have show no signs of diabetes for almost a year now.  I have more choices in life and I get to choose.  I like the fact that it is possible to defeat and ward off many illness by diet alone.  If only my mom knew what I know, she might still be around.   FOOD IS MEDICINE FOLKS.

Till the next time...

 Many blessings,
Mary Helen

Wednesday, July 18, 2012

FERMENTED LEMONS WITH RINDS


FERMENTED LEMONS WITH THEIR RIND
AFTER 7 MONTHS THEY STILL
LOOK BEAUTIFUL
Seven months ago back in January my friend gave me about 25 pounds of ripe organic lemons.  I juiced and froze some.  I made lemon marmalade to preserve another portion of the lemons.  However, I wanted to find a way to preserve some besides canning it and killing anything that was alive in the heating process.  I found I could ferment it in a salted lemon juice brine.  Well after seven months let me share with you the results.   They are just as beautiful in color.  They came out in its own thick "syrup" full of natural pectin. They are now so delicate, and fall apart easy.  They looked so juicy I just had to try it.  Wow, it just melted in my mouth, rind and all.  I am very impressed.  I believe in food storage too besides eating healthy and this is how I did it...

Yes thats a thick salty lemon syrup full of natural
 pectin as well as probiotics and vitamins.
INGREDIENTS:

  • Lemons 8-10 large (preferably organic) washed and sliced thin
  • Jar sterile and large enough to fit the lemons leaving 2 inch headspace
  • Juice of 3 large lemons
  • 1/3 cup mineral salt (sea salt kosher salt, or pickling salt is fine just no iodized salt.)
  • warm water enough to cover lemons at least 1 inch over the top
I mixed 1/4 cup warm water with the lemon juice and till the salt disolved in a separate bowel.  In a sterile jar I began packing  the sliced lemons in the sterile jar tightly.  I used a food pusher getting most of the air out every few layers. In doing this I added a little of the lemon juice brine solution each time. I did this till it was packed leaving a two inch headspace.  I then filled it with the lemon/water/salt solution leaving a one inch headspace.  I left it in a dark corner for a month.


I was not in a hurry to try it after a month because I don't like the rind or the white pith and I thought it would have that "pithy bitter taste".  So in February I put it in the back of the refrigerater for the past 6 months.   So after 7 months it's so ready.  I had to try it.   I am again a happy camper as I now have another probiotic ferment to share with you and my friends.

One note please.  This is a very lemony salty fermented tangy product. Similar to a salted plum. I would not suggested you eat it as is.  You might want to consider making a sauce and adding a couple of slices to a cooked product.  Or maybe a lemon vinaigrette.  Chopped fine and sprinkle it in a salad is another option right?  If you have any ideas let me know.  How about dried? Or any comments, please feel free to leave one.

Thanking you in advance and many blessings,
CAN YOU SEE THE TENDERNESS
Mary Helen
SO DELICATE, THEY JUST FALL APART

JUICY MOUTH WATERING FERMENTED LEMONS

Monday, July 16, 2012

MILK KIFER CHEESE SPREAD WITH COCONUT AND HONEY

Milk kifer cheese spread with coconut, honey and parsley.  It's all good.
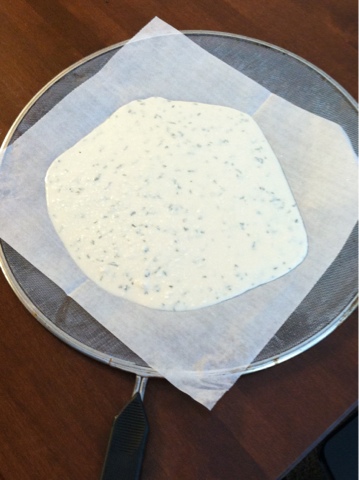
Yesterday I had about 4 cups of nonfat milk in kifer grains which had curdled a bit too much.  It was  a lot more tart than what I had set out for.  Considering my intentions were to make a soft sweet cheese, similar to soft goat cheese with honey.  After straining the curds and whey. I seasoned the curds and I set it in my oven to get most of the moisture out with the light on.  It's perfect there where the light just warms it slowly, not harming the probiotic cultures.  If you have a dehydrator, by all means use it.  I plan on making a simple one just not today.  You do not need any fancy equipment to make this simple recipe.  Anyway, I had put my cheese spread out on parchmont paper and on a screen.   After 24 hours I flipped the cheese spread over to the other side and on a new sheet of parchmont paper, and continued for another 12 hours, until it was drying around the edges.

I decided to mask some of the sourness of the kifer cheese (curds) by mixing together...

Milk kifer grains, curds and whey
automatic separation makes it easy
to rid most whey from the curds.
Milk kifer spread out on parchmont paper
and put on an anti-splatter screen. to dry.
Whatever works right?

  • one tablespoon milk
  • one tablespoon powdered coconut milk
  • one tablespoon honey granules (or any sweetener)
  • one teaspoon parsley

Mix all the ingredients well.  By this time the kifer cheese spread is quite pliable, like  play-dough.  This makes enough probiotic kifer cheese spread to fit in a 4 oz  jar or container with a tight lid.

This will keep in the refrigerator, where it will continue to slowly ferment. It's great on crackers, toast, or bagels. Try it for yourself,  It's all good, it's all probiotic.  Besides being healthy, it's tasty, homemade, and quite affordable. Note:  For best result use within 5 days.  It's just another way to get your probiotics. lol  Don't forget, "Food is Medicine", and that is not a lol matter.  And it only takes just a spread a couple times a day to get a lot of probiotic cultures in you. 

I know it is a very time consuming recipe. However, you don't have to kifer-sit this recipe like you do milk in kifer grains.  It just takes time, time you could spend doing other things, right? But so worth the little effort put forth.

Enjoy, and many blessings,
Mary Helen

Sunday, July 15, 2012

8 Reasons to Add Probiotic Foods to your Diet

8 Reasons to Add Probiotic Foods to your Diet.  Sauerkraut again to the rescue.  However I would wait till it has a sauerkraut smell, because according to this recipe, it says to let it ferment just a short while.  I ferment all the time and at this stage it smells pretty foul and I would not drink it till this smell passes.  It will pass, trust me.  lol.